Sunday, December 04, 2016

Using Google Tools to Personalize Learning #GoogleEduOnAir

Yesterday I had the absolute privilege to join thousands  of amazing educators learning and sharing their learning as part of the Google for Education on Air Event - If Takes A Teacher.


I learned so much from watching fellow educators share their insights into teaching and learning throughout the day.  I also learned preparing for my own session -
Personalized Learning With Google Tools.   
(Thank you,  Erica Zimmer (@NerdyMaestra) and Craig Lyndes for your help with this session)


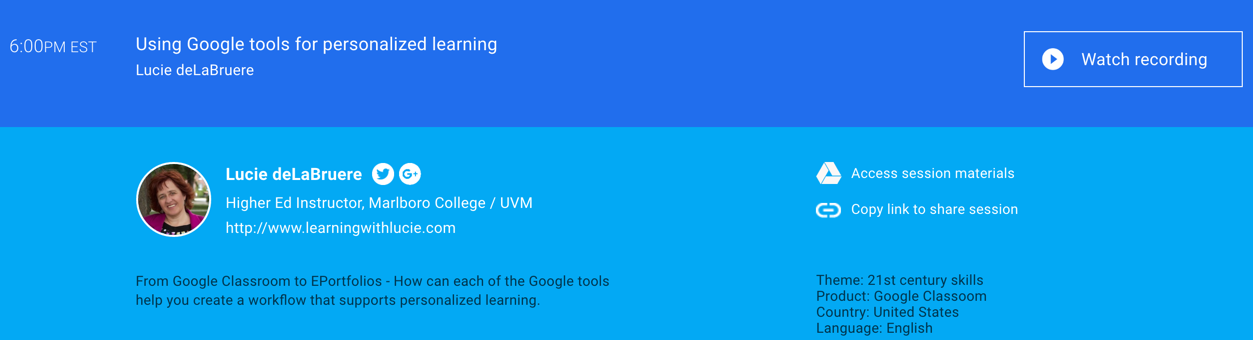
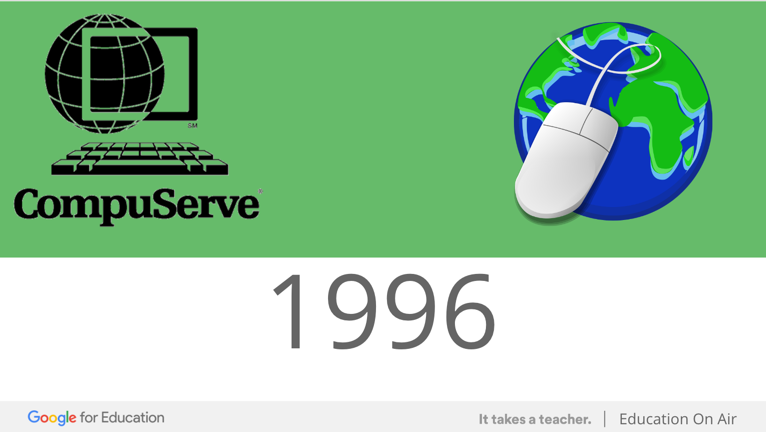
Preparing for this session, gave me a chance to reflect back over the past 20 years - starting with the year 1996 - the year technology tools allowed us to personalize learning like never before.


Although the focus of the session was on Google tools  - I really wanted it to be grounded in the practice of personalized learning,  and I felt so fortunate to have spent my career teaching in a state whose conversations about personalized learning started long before GMail or Google Docs were in our toolboxes. (Gmail was introduced in 2004 and Google Docs in 2008)


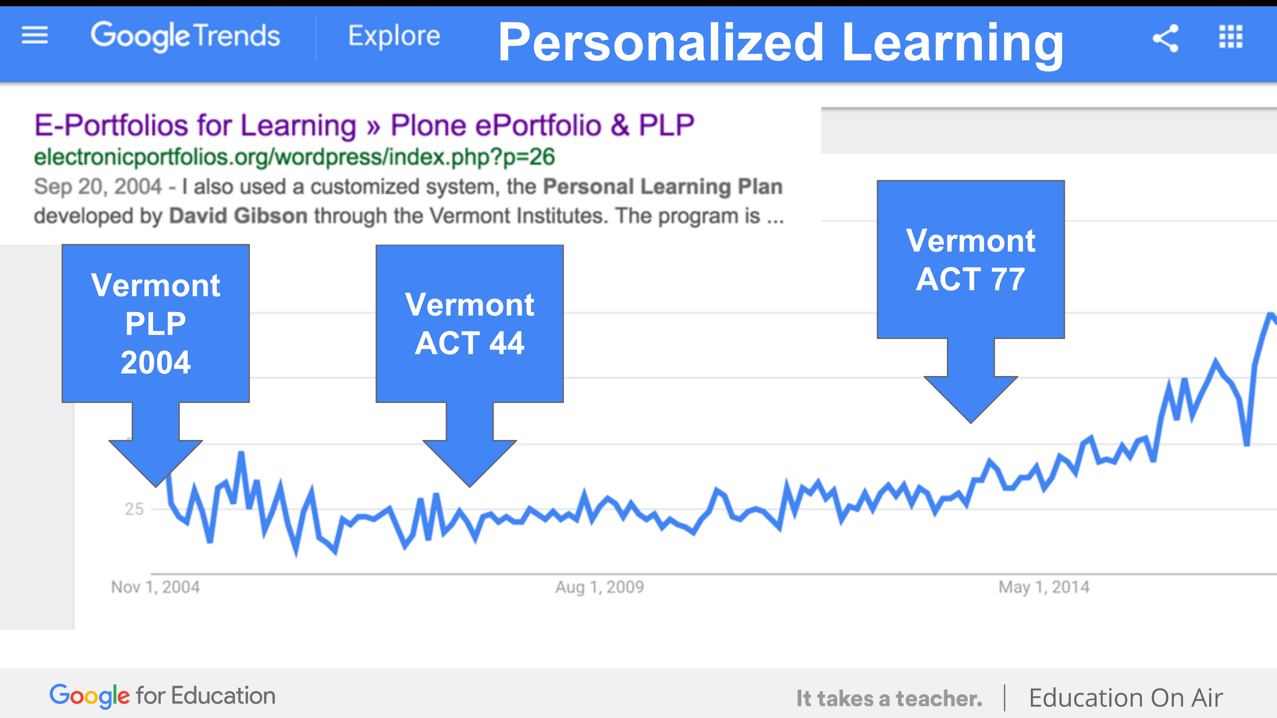
I feel very fortunate to have been in some of those early conversations with Vermont educators like Lauren Parren and David Gibson who were leading the way creating tools for personalized learning.
(“The Personal Learning Planner: Collaboration through Online Learning and Publication,“Havelock, Gibson, Sherry, 2003)

I feel very fortunate to have been part of an educational landscape that in 2008 had a vision that personalized learning via flexible pathways should be an option for all our students (ACT 44)  and that in 2013 passed (Act 77) so that every student starting in grade 7 would have their own personalized learning plan and benefit from flexible pathways to graduation.

My 30 minute presentation during the 2016 Google Education on Air Conference was not enough time to tell the story of personalized learning,  but it did give me a chance to give a shoutout to my state for being a leader in the personalized learning movement.   

Those who know me probably are not surprised that I tried to squeeze in so many different ways that Google Tools could be  used to personalize learning in this short time slot!


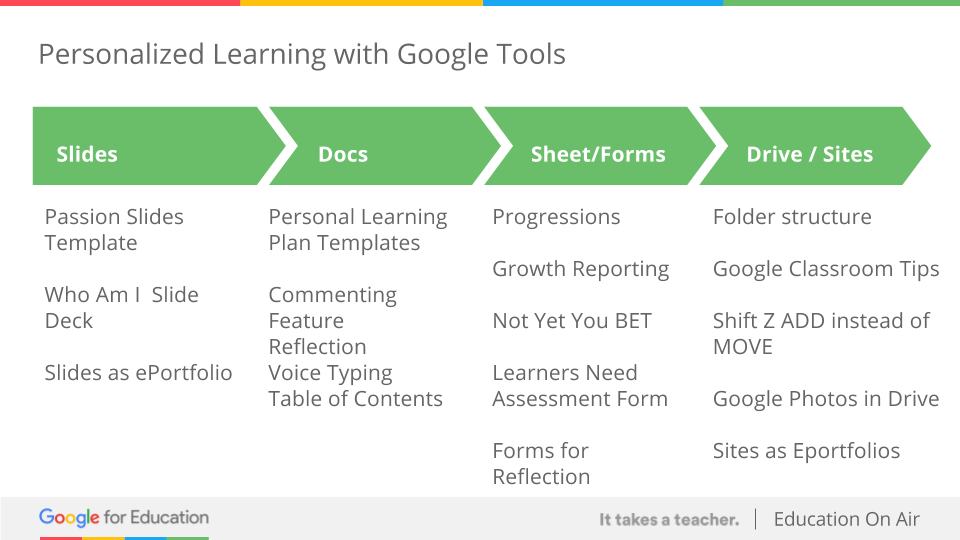
And honestly,  all I could do was ‘touch’ on each of these ways VERY briefly--just enough to give participants the big picture that those of us with access to Google tools have so many opportunities to personalize learning in our digital toolbox.   

I tried to add links to resources and blog post that could provide more information when possible,  and promised to add new blog posts to flesh out the details outlined on some of the slides below.


So  in keeping with that promise -- this is the first of a series of blog posts on how to use each of the Google tools mentioned above to support personalized learning practice. Feel free to subscribe to this blog if you want to be notified of the next in the series.  I’ll tag the series with  #personalizelearning   and #googletools  and of course,

#GoogleEduOnAir


Disclaimer:  Of course a tool (or a law)  cannot personalize learning -- It Takes a Teacher!  
(but the right tools,  and a little push from our legislature can support those amazing teachers who are working everyday to implement a vision of personalized learning)


Wednesday, November 09, 2016

Bandwidth is like Air - Don't suffocate student learning opportunities

Yesterday I got a chance to read a response that Craig Lyndes provided to someone asking "What is the minimum bandwidth per student or device that we need to plan for?"

My reaction was ... THIS ADVICE is so SPOT on, it feels like a blog post.  Craig gave me permission to share this advice as a blog post.   Thank you Craig for sharing over 30 years of experience in educational technology and your relentless commitment to ACCESS!


At this point I think bandwidth is the air that our technology initiatives need to stay alive.  If we want teachers and students who are competent users of technology and we want the benefits that technology can bring to our students' learning we can't be suffocating them. 

You say you have a fiber connection so I assume you are capable of getting a Gig.  I would highly recommend doing that - remember that is what e-rate was meant for.  
If you had a room in your school with poor air circulation you would not spend huge sums of money designing and implementing a machine that would identify each student, drop a mask down and meter out the oxygen.  Teachers get as much air as they want, kids have to breath like deep sea divers and guests are on their own. 

You would fix the problem by putting in an air system sufficient to allow everyone to breath as much as they wanted and have some extra for special occasions. 

Ask your people what they want.  I'll bet they want their technology to be simple, dependable and fast.  Use your technical expertise to provide them with what they want.  Spend your money and energy on education.  If you want to tinker and do amazing technology create with a raspberry pi.
I know I'm preaching to the choir here but my inability to convince people who have a vested interest in control and obfuscation  makes me appreciate an opportunity to discuss with like minds.

For those who don't know Craig.....  Let me repost a blog post I did the year he won the the Frank Watson Award for his commitment to ACCESS!

--- reposted from

Each year the Vermont educational technology community selects an award recipient to received the Frank Watson educational technology award.  (Learn more about Frank Watson,  the father of information technology in Vermont at  http://www.uvm.edu/pt3/vt3/fwatson/fwatson.htm)   This year, Frank not only participated in the 25th anniversary of Vermont’s primary educational technology conference, he also presented the  Frank Watson award  to Craig Lyndes, network administrator at St. Albans City School, Fairfield Community School, and Franklin Central Supervisory Union.   
 

Frank’s message to the group of over 500 Vermont educators was that “we’ve got a lot of stuff. And what we need to do is learn to use that stuff to make sure that our students are thinking, that they are creative, and that they are enabled by this stuff.  How do we do that. These are the same question we were asking 25 years ago.”  Frank urged educators to go back and reread the works of Seymour Papert and Jerome Brunner and revisit their important advice about getting students to think and develop creative problem solving skills.
He then proceeded to introduce the winner of this year’s Frank Watson award as a man who has committed to giving students and teachers access to the technology tools in Vermont schools in ways that supports this all important goal.
 “I’ve had a ton of experience with this person.Early on when I was at UVM, and I got bit by the bug (or the byte) I went to this person’s school to see what was going on and I ended up with him and some other people in a very interesting situation..
A sort of an open ACCESS lab of computers filled with kids filled with kids using the machines and learning how to do it..
 ACCESS!  that word is a very important word for this person
ACCESS not only to students but also to teachers that makes a very easy entrance to what they are doing...
Its very important that this happens because if it looks like its too difficult then people are going to say “NO”  I’m not going to do it;  I’m not going to use that equipment...
This person understands that ACCESS point and how to manipulate it to get it to people in the school’s he’s working with..
This person has experience in 4 major school districts in this state and has impact on all four. Fortunately I have had an opportunity to see him at work in 3 of those districts and was always welcomed and always learned something before I left..
If this person knows who they are right now, they should be getting ready t come up here
I’m going to give one more clue,
This person is a person I could have a conversation with about something called Wintermute.  We have some people who remember what Wintermute use to be…
Will Craig Lyndes please come up and receive the 2010 Frank Watson educational leadership award."

------------
I am so pleased that the Vita-Learn has focused on the importance of access in the equation of  successful implementation of a vision for the use of technology in schools. Craig  has been such a strong advocate of access and working so diligently over the past 25 years to bringing
it to Vermont schools.  Whether it be his earlier efforts with
"Wintermute"  and with the CVU bulletin board (note the long list of
"STUDENTS"  who ran this BBS  from 1985 - 1995 at
http://bbslist.textfiles.com/802/ )   or his most recent initiatives
to increase access and connect the FCSU to each other and the internet via fiber.  Craig
thank you for using your energy and resources to improve access in
ways that move Vermont school's forward  to fulfilling the vision that
Frank Watson and so many others have for our students.
----- I'm so proud to be married to this man!  

Thursday, August 18, 2016

Project Based Learning at the heart of Creating and Making

This week I got a chance to attend a meeting lead by Lars Hasselblad Torres, Director of the Generator as he kicked off a collaboration project between Burlington's  makerspace the Generator,  area schools, and Champlain College to help educators vision how MAKING can support Project Based Learning in their classrooms.   The day was filled with conversation and activities that kept us engaged in a process that started with sharing our own personal goals and ended with our being ready to submit project proposal that might exemplify a collaboration between K12 educators, college, and a community maker-space.

I  especially loved the way Lars got each of us to envision and articulate elements of successful project based learning by having us think with our hands.


Throughout the day I found myself revisiting some of my own  experiences as an educator where project based learning was at the heart of my classroom - which lead to my digging up this blog entry from almost 10 years ago. 


This entry was originally posted as an entry on aVTCITE blog following discussion about Project Based Learning in 2006. 

Project Based Learning

Authentic Audience - The Ring Story
One April morning in 1996 --the good ole days when perhaps one or two emails per day found their way to my inbox—I noticed a peculiar subject line on an email from a man whose name I did not recognize. 
Sender: Claude Williams 
Subject: Treasure Found. 
Message:  Dear students at NCUHS,  I think you might be able to help me with something that has been on my TO DO list for more than 15 years.   In 1980 I was scuba diving in the Phillipines and when something shiny caught my eye.  It turned out that I had found a gold ring.  The ring had a bird of prey on top; the letters NCUHS on one side; the words “Class of ‘78” on the other; and the initials TKD carved inside.  Today I was trying out this new Internet thing and typed the letters NCUHS in Alta-Vista.  I found this Cyberfair Project from students from NCUHS.  Could this ring belong to someone from your school. 
I read the email to my students.  They immediately ran down to the guidance office and located the 1978 Falcon Yearbook. Todd K Durkee was the only student with those initials.  After a few phone calls they were able to locate a phone number for Mr. Durkee. “Did you ever lose a class ring?” they inquired over the phone.  He hesitantly answered “yes… in 1979 while I was cliff diving in Hawaii”.   Mr. Durkee got his ring back;  Mr. Williams crossed an item off his To Do list; and 15 students experienced accidentally discovered an Authentic Audience for what started as a project based learning activity using technology.
Probably one of the most motivating factors about Project Based Learning is the fact that you are solving an Authentic Problem for an Authentic Audience.  Today’s technology has made authentic audiences even more reachable than ever before. Years ago video production, publishing or  music production would have been cost prohibitive.  Today’s students can become web publishers,  music composers, and video producers for real audiences at a very nominal cost.   Projects like Cyberfair,  The Vermont Midi Project, The Green Mountain Mooooooooovie Festival,  provide forums for student projects with Authentic Audience.  When my fifth grade students realized that their podcast was going to be on I-Tunes, the quality of their work went up 200%. 
Project Based Learning using effective Technology integration increases engagement by making learning meaningful.   A well constructed project provides several opportunities for students to create different PRODUCTS as a result of an indepth study of different CONTENT.  A skilled teacher will create a LEARNING ENVIRONMENT for students with varied learning styles to experience the PROCESS of project based learning in a way where each of them can be a successful.   Starting with an Essential Question where the project provides the structure for a group or individual inquiry makes the Project even more powerful.  In my earlier blog entry I discussed how our Cyberfair project – Life On The Border --provided the opportunity for Differentiated Instruction.
But without the Essential Question and the Alignment to Standards the project becomes simply a “neat activity”.  Each year I search for a theme that ties into the standards of one or more content disciplines.  I look for partners who are ready and ripe to take on this type of learning.  I look for content standards from that discipline that would lend themselves to a project type learning experience.  Adding the technology standards is a natural next step.   Finally I meet with the teachers of that discipline to brainstorm Essential Questions that would provide the project with enough depth and momentum to drive the energy we are about to expend on this project.
Project based learning is hard work.  But the feeling of pride from the accomplishments of our projects is not just felt by the students—it spreads across the community.  The standards that we meet (especially those in the Vital Results) area cannot be adequately measured by standardized tests.  The challenge we face as educators is to continue to advocate for authentic assessments (such as those found in project based learning) to be considered as part of the ASSESSMENT formula that we use to measure the success of our schools.  If you have a chance to hear the student voices on  the Cyberfair 2001 video,  I think you would have a hard time spotting the ‘student’ whose learning disability would bring down your NECAP scores;  this is also the student whose performance on this project earned my highest praises in their letter of recommendation for employment.   While National Test stores tell part of the story, Project based learning tells the rest of the story!


Sunday, June 05, 2016

AppSmash - WeVideo and Google Slides


The new WeVideo IMPORT PDF feature combined and Google Slides are a great duo  for collaborative video creation!  


When it comes to collaboration, Google slides rule!  
When it comes to creating videos,  WeVideo rules!


Now  with the new IMPORT PDF feature of WeVideo, collaborating on a Video just got even better.


First of all let me describe the new Import PDF feature of WeVideo and why this has me so excited!


Usually when we add media assets to a video creation project,  we are adding photos, video clips, and sound clips!  


But recently WeVideo has made it possible to ADD PDF files as media to a video project.  When you select Upload Media and you select a PDF file, WeVideo automatically separates each page into a different image for you to drag and organize as you like into the timeline of your video!  Way cool!  


  1. Select Add Media      2. Select a PDF file


3.  Drag individual pages from your PDF from your MEDIA folder to your TIMELINE


So now you can take any tool that can save as a PDF and use it to create content for your Video projects!  (PowerPoint, Word,  Open Office,  Google Docs,  Google Slides)
This opens up lots of possibilities for Cover Pages, Transitions, Backgrounds for Green Screen, and even core content in your narrative.   (PowerPoint, Word,  Open Office,  Google Docs,  Google Slides)

When you are ready to import your content into WeVideo

Simply Use DOWNLOAD AS  and select PDF from the File Menu of your favorite tool!


Then Upload Media (ADD the PDF) to the Media Folder for your WeVideo Project.  


Each slide will appear as a separate media asset that you can drag onto the timeline.


Once these are added to the Media folder of a project,  only ONE of the collaborators can work on the video at a time!    Since the bulk of most video project is planning,  storyboarding,  locating or creating media assets, using Google slides is a great way to keep all members involved in many steps of the video creating  process. The whole team stays actively involved for much longer.  


If you choose Google Slides as your content creation tool for your video,  your team can
  • work together to  create beautiful content for a digital story or  narrative slideshow
  • organize the content  in any order they  want
  • revise and reorder them as they work
  • use comments to discuss and plan throughout the process
  • use the NOTES section of Google slides to plan narration or storyboard
  • add placeholder slides for where video clips  or effects might appear in the projects

Illustration of a pencilOnce the media assets are imported into the Video project,  your team can continue to collaborate using the collaborative features of WeVIdeo EDU, but remember that the at this point in the process, the   collaboration happens ASYNCHRONOUSLY!  Which means only one team member  can EDIT the video at a time.  Similarly to the way Wikis or Google Sites works, the first person to start editting gains control of the video, and others editors are locked out until the collaborator is finishes, and leaves the project.   As soon as the editor saves their edit and closes the video project, the video is available for the next person to edit.  How I describe it to others is that  “Only one person can hold the pencil at a time.  You need to let go of the pencil to pass it on to someone else to edit”.


But as with any Group project,  the rest of the team can be working on finding music or sound effects,  creating credits and title slides (in Google Slides).    Or perhaps, you might break up your projects in sections  and create more than one Google Slide Show.  After each section is complete,  you can provide different team members with the job of adding that section to the video project and editting the video project, while the rest of the students continue to work on the the next section of the project in Google Slides.

One more collaboration tip:  For each video project, consider setting up a Google Folder where you can store your Google Slides along with any images, photos, and music that you might want to add to your video projects.  (Even though only one person can add to the actual video project at a time,  ALL members of the team can add images, video clips photos, and music to a Google folder synchronously -- and they can even do this from their phones using the Google Drive app!


Meanwhile the ONE person who is actually editing the video project from inside we Video can simply IMPORT the new media assets into WeVideo using the IMPORT from Google DRIVE feature of WeVideo!  


I would love to see your video projects and hear how using Google Tools with WeVideo helps your team collaborate on video projects!  


Thursday, June 02, 2016

And the Winner Is....

As many of you know, I do a lot of my work remotely from our 1983 vintage Bluebird bus.  There are advantages to that like having the view from my office change from the ocean in San Diego one week to the Arizona desert in the following week.

However one of the downfalls is that you miss out on  some of the energy that face to face interactions bring to an event.  Whether I’m teaching an online class or working on a committee remotely,   I’m constantly looking for ways to  bridge the miles, keep learning personal, and bring the human energy found in face to face interactions to my work.


Recently I was sitting alone in my office getting ready to make good on a promise to give out some  prizes for a contest where students and teachers shared  links to videos and other multimedia projects that might inspire others to create videos in their teaching and learning  environments. 

I was so excited by the outcome -  we collected 100 videos and made them available in a screening room  (popcorn and all) in the Innovation Lounge of  Vermont’s  spring educational technology conference - Dynamic Learning.  And the best part is that this collection could now be shared anytime - anywhere  to inspire others.  Why not grab some popcorn and watch a few flicks yourself.


How I wish everyone who submitted could be in the room with me as I expressed my gratitude to them for their hard work completing the projects, but also taking the time to share it!  The face to face thank you followed by a high energy random drawing of the prizes would have been ideal.  And suddenly I had an idea!  What if we could use video  to capture some of the excitement of a face to face random drawing!


Within minutes I had found a fun random name picker  from Class Tools  and was using WeVideo’s screenrecording  tool to record the selection of 3 winners.

It might not be quite the same as being there face to face, but it was definitely more fun for me to select the winners and hopefully more fun for teachers and students to watch the spinningwheel than to get a quick 20 second email that list 3 winners.  At least for a few minutes..they could feel the excitement  of not knowing if “THEY”  would be the winner.


Instead of a text based thank you note with a list of 3 winners, 
 here is what our participants received.


Yes there are lots of screen recording tools that can be used,  but the multitrack timeline mode of WeVideo allowed me to add some fun transitions,  some text based graphics, and  some suspenseful music from the WeVideo library.  Here’s a screencast of my process that might be helpful for those of you who are new to WeVideo.


(Disclosure:  This Screencast was not created with WeVideo since I had to
capture WeVideo screen capture features to create the tutorial) 


I love thinking of new ways to leverage today’s technology to support teaching and learning. I would consider this application to the at the AUGMENTATION level on the SAMR model. Hope this little tip might be helpful to those of you in a blended learning environment.


Sunday, May 01, 2016

Permission to Fail at #Picademy

This weekend,  the second cadre of #PICADEMY USA participants is getting introduced to the the wonderful pedagogical practices of the Raspberry Pi Foundation. Watching the #Picademy hashtag on Twitter throughout the weekend, brought back memories of my experience in Mountain View just a few months ago at the first Picademy USA.  


When I think back about that weekend for me,  I vividly remember Carrie Anne Philbin unveiling the weekend agenda.  


Describing that this weekend we were going to FAIL


However, not long after, the talented crew brought us into a room where they quickly led us to amazing feeling that comes with SUCCESS! I see the same feeling of success emerging from this weekends #Picademy tweets.


https://twitter.com/Raspberry_Pi/status/726508676001878016

When I described PICADEMY to others, I found myself describing how the team had shortened the distance between taking the Pi out of the box and experiencing the joy of success.


Everything was setup to make that journey as short as possible.


Monitors, keyboard, mice, and SD cards had all been strategically prepared so that you could just plug in your PI  and within minutes  experience the joy of success. I see this same exhilaration from this weekend's tweets from #Picademy.


https://twitter.com/Raspberry_Pi/status/726508676001878016

Having equipped us with the joy of scoring some quick wins, we were prime and ready to move on to deeper learning.  I can see from today’s tweets that this new cadre is experiencing the best part of #Picademy -  the effective and sound pedagogy masterfully implemented by the Raspberry Picademy team.


But equally important in the conditions that were set up for the day  was setting the expectations that along with joy of success,  we were also going to FAIL

But we were going to fail in a safe environment -- an environment of trust -- a trust that we would be surrounded by what we needed to get back up again after the fall.   Throughout the whole experience, we were surrounded by the expertise of one of the Picademy team  or our Picademy colleagues to help us move past obstacles that came along our learning path and build on the learning from each iteration.  


I remember the feeling I had during the Picademy Camera workshop when my computer stopped responding as it should.  I could no longer keep up with the hands on part of the workshop since my PI simply was not reacting like everyone else’s Pi.  A team member was quickly there to help troubleshoot.  We replaced several different components, none of which seemed to rectify the situation.  Finally Ben brought me a new configured SD card and Voila, I was back up and running again and some great troubleshooting skills along the way.


The importance of being able to quickly recover from a Fall / FAIL  is important in gaining the confidence you need to take risk.  


Obviously the conditions that we had at Picademy (being surrounded by amazing mentors and peers)  to help us recover was not going to be part of our face to face reality when we would return home and start playing with our new Raspberry Pi on our own.


But there are a few ways that we can create ‘some’ of those conditions for ourselves.


  1. Become engaged in the Raspberry Pi community online.  

    The Raspberry Pi Forums provide an excellent resource for both new and seasoned Raspberry Pi enthusiast to get helpful advice from.  

    Following each other on Twitter also provides us with access to peers to share our successes with and mentors to reach out to when we need help.

    And as an added bonus,  as Raspberry Pi Certified Educators, we are lucky enough to be part of an additional online community that can provide us with an an additional level of peer support.
  2. Learn to create a backup copy of your Raspberry Pi SD card.

    Recently I was working on a PI project that I hoped to have ready for the 2nd Birthday Bash of our local Makerspace. As the deadline came closer, I found myself less willing to take risk with the project for fear that I would “undo”  the progress I had made thus far.  I should have just stopped and learned how to create a backup of my SD card.  But with little time to spare, I just kept moving forward on the project -- but with much more caution than I wanted to feel -- for fear that I might FAIL  (right before the big Bash) leaving me with nothing to show.   

    I have since rectified that and used these directions to familiarize myself with the process of creating a couple spare Raspberry Pi SD cards, and I now feel more confident to experiment  and also will easily be able to create a new backup SD Card during those ‘scary’ moments when I’m about to try something that’s unfamiliar or may feel ‘risky’
    https://thepihut.com/blogs/raspberry-pi-tutorials/17789160-backing-up-and-restoring-your-raspberry-pis-sd-card
  3. Create easy access to a working PI setup  Find a setup where you can easily grab your Pi  and start playing anytime the spirit hits you --  similar to the classroom’s at Picademy where keyboard, mouse, and monitors were all setup to shortening the journey to success.    For me, creating this condition was to learn to SSH and Remote Desktop into my Pi from my laptop.   Since I live in a very small space (a 1983 vintage bus) and and am so mobile,  an extra monitor and keyboard were not an option.  Once I learned how to Remote into my Pi from my computer,  I found myself bringing my PI with me, and playing with it anywhere,  anytime I had time and inspiration to play.
I’ve decided to share my journey to learning to clone my SD Card as well as to access my PI from my laptop and my Chromebook in the next few blog post. But this post has gotten long enough already and I think I’ll spend the rest of the weekend keeping an eye on Twitter for what I’m sure will be an exciting day of projects created by the creative educators on their last day of Picademy.

I  suspect that the day will end similarly to our final  day at the Mountain View Picademy day  with lots of celebrations of failures,  many iterations of successes, and some very fun prototypes.  But most of us it will left us inspired and equipped to keep on making!  


 Part 1 ,  Part 2 , and  Part 3 of my blog post series from the first #Picademy USA in MountainView this past weekend - including this Video Summary.